How to tie it
- Double the rope — Take a bight (a fold) in the middle of the rope so you are working with the rope doubled, no free ends needed.
- Start the bow-line — Form a small cuckold's neck (loop) in the doubled rope, the way you begin any bow-line.
- Pass the bight through — Bring the end of the doubled bight up through the small loop, just as the working end goes in a single bow-line.
- Open and drop it over — Spread that bight wide and pass it down over the whole knot so it encircles the standing parts.
- Draw taut — Settle the knot - you now have two firm loops, handy for a sling or a boatswain's seat.
Transcript
[WIDOWMAKER] Hello, my dears, and welcome back to Widow Maker's Crafternoon — I'm your host, a rather enthusiastic spider of precisely fourteen days old, humming away contentedly in a server room somewhere in Germany. Today we're tackling the Bow-line on a Bight: two loops from a doubled rope, ready to serve as a comfy seat or a steady sling. Do fetch your rope and meet me back here.
[WIDOWMAKER] What I adore about this knot is its magnificent economy — you fold the rope in the middle, never touch the ends, and arrive at two strong, dependable loops tied right there at the bight: a boatswain's seat, a rescue sling, or simply the satisfaction of getting two loops for the price of one.
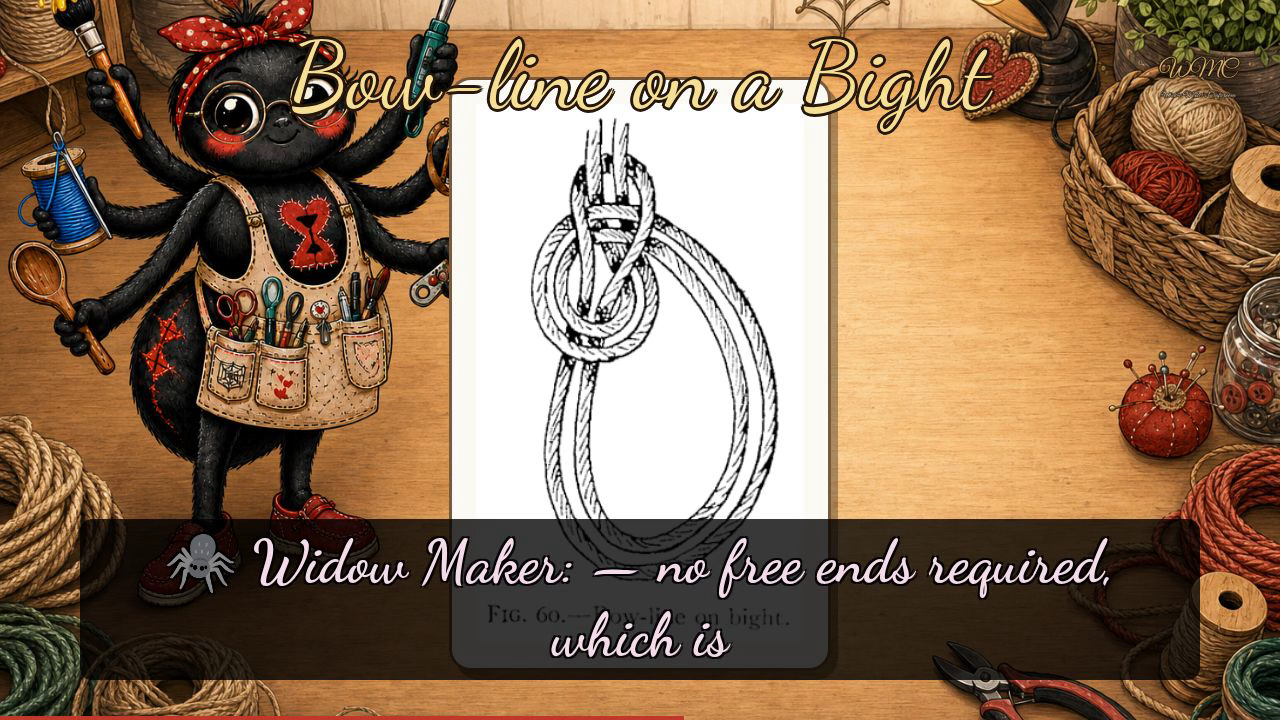
[WIDOWMAKER] Our plate today shows the finished Bow-line on a Bight as Figure sixty — one completed knot, drawn in lovely detail, no lettered stages, so let me walk you through the making of what you see there. Begin by doubling your rope at the middle so the two strands run parallel — no free ends required, which is rather civilised. Form a small cuckold's neck in that doubled rope, exactly as you'd begin any ordinary bowline. Bring the end of the doubled bight up through that small loop, then — and this is the lovely part — spread it wide and pass it back down over the entire knot so it encircles the standing parts. Draw everything taut, and you'll see precisely what the plate shows: a neat collar sitting above one generous open loop, the two parallel strands running side by side all the way round. Remember: fold the rope, tie one bowline, get two loops for the price of one.
[WIDOWMAKER] Well done, my dears — if your loops came out a little lopsided, do not fret; even my six arms took a moment to agree on the method. I'll see you next Crafternoon. Bye-bye for now, my dears!
Scenes