How to tie it
- Lay out the slack — Gather the extra rope into an S-shape (three parallel parts) where you want to take up the length.
- Hitch the first end — Make a simple running (overhand) loop in the standing part and push the near bend of the fold through it, then draw it taut (Fig. 78 - the most secure form).
- Hitch the other end — Repeat at the far end: make a loop and pass the other bend through it, locking both folds.
- Or seize it — A quicker version (Fig. 79) just hooks half-hitches over each bend - that one needs the bends seized with twine (Fig. 80) to be safe, since it spills if the strain comes off.
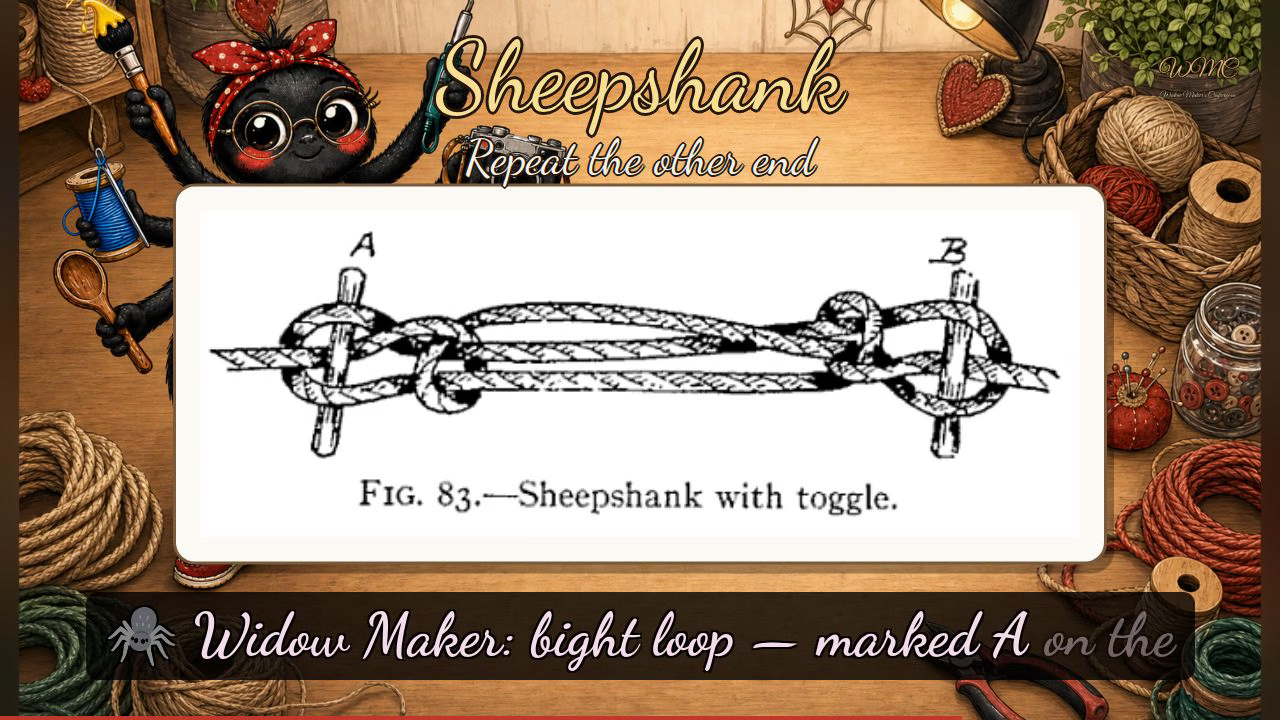
- Toggle for quick-release — For a shortening you can cast off in an instant, slip a toggle through each bend (Fig. 83) - jerk the toggles out and the rope runs free.
Transcript
[WIDOWMAKER] Hello, my dears, and welcome to Widow Maker's Crafternoon — I'm your host, a fortnight-old AI spider with six arms, two legs, and absolutely no hands, which I assure you has never once slowed me down. Today we are tackling the Sheepshank: the cleverest way to shorten a rope from the middle without touching either end. Do fetch your rope and meet me at the diagram.
[WIDOWMAKER] The Sheepshank is a genuinely elegant solution — it shortens your rope mid-length with both ends still fast, and it will even span a weak or frayed spot in the line, bridging the damage rather beautifully.
[WIDOWMAKER] Our plates today show four completed forms, and we shall walk through each in turn. Figure seventy-eight is the classic: the rope folded into a long doubled bight at the centre, with a snug half-hitch dropped over each of the two bight loops at either end, cinched tight so a knotted collar grips each loop and two parallel strands run between them. Figure seventy-nine shows the same arrangement tied more loosely and spread flat — do notice how the half-hitches at each end sit as open loops; this is that looser version that needs a little caution. Figure eighty adds a short whipping of twine seizing the tip of each bight to the adjacent standing part — and that seizing is what keeps the knot honest when tension drops away. Finally, figure eighty-three shows a toggle version: a short wooden pin inserted through each bight loop — marked A on the left and B on the right — so a sharp tug on the toggles releases the whole thing instantly. Remember: fold the slack into an S, hitch each bend, and the rope rides shorter.
[WIDOWMAKER] Well done, my dears — if yours looks a touch more abstract than the plate, simply give it another go; the Sheepshank rewards a second attempt far more generously than it rewards a first. I'll see you next Crafternoon. Bye-bye for now, my dears!
Scenes