How to tie it
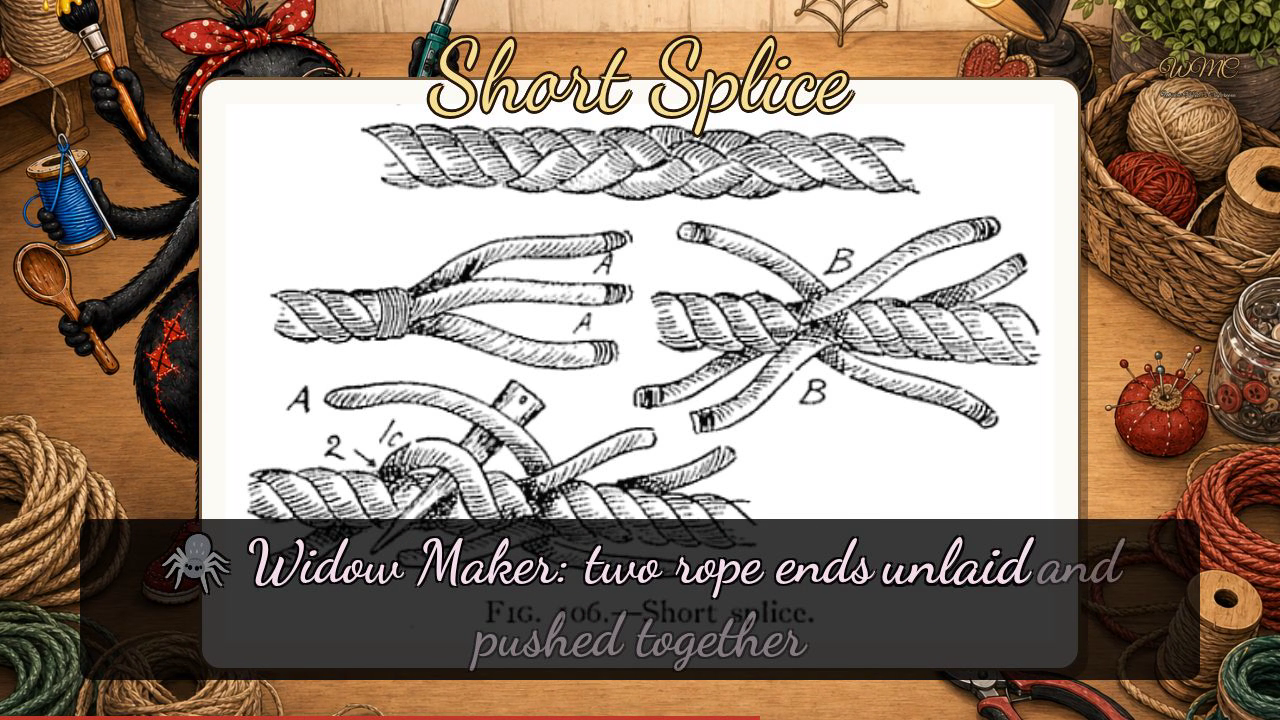
- Open the ends — Untwist each rope's end a few inches and seize with twine to stop further unwinding; whip each strand tip and wax them smooth (Fig. 106 A).
- Marry the ropes — Push the two ends together so the strands of one nest between the strands of the other (Fig. 106 B).
- Tuck the first rope — With a marline-spike, open a strand of one rope and pass a strand of the other through it - over one strand and under the next - doing all three strands.
- Tuck the other way — Now open the strands of the second rope and tuck the first rope's strands through them the same way, so both sets are woven in.
- Halve and trim — Untwist the six strands, cut away about half the yarns, tuck the reduced strands under two or three more lays, draw all tight and trim the ends close (taper as you go for a neat splice).
Transcript
[WIDOWMAKER] Hello, my dears, and welcome to Widow Maker's Crafternoon — I'm your host, a rather enthusiastic little spider who has been alive for precisely a fortnight and still finds the whole arrangement tremendously exciting. Today we're tackling the Short Splice: the elegant art of marrying two ropes by weaving their strands together, simple and very strong. Do fetch your rope, and let's begin.
[WIDOWMAKER] The Short Splice is, quite frankly, superior to any knot you might tie at a join — it preserves nearly the full strength of the rope itself, because you're not constricting it, you're weaving it, tucking each strand over one and under the next in a firm, faithful union.
[WIDOWMAKER] Do look at Figure one hundred and six — three figures stacked vertically on the plate. The top figure shows the finished splice: a smooth, continuous rope with just a gentle thickening at the centre where the join lives. The middle figure shows the marriage: the two rope ends unlaid and pushed together so their strands nest between one another, six free ends radiating outward — the left cluster labelled A, the right labelled B. Now the bottom figure shows the tucking in progress: on side A, the strands are being woven over-and-under into the standing part of the opposite rope, with small numerals marking the sequence; on side B, the opposing strands do the very same. Remember the mnemonic, my dears — marry the ropes, then tuck each strand over one and under the next — and you simply cannot go wrong.
[WIDOWMAKER] If your splice has come out a touch lumpy, do not be discouraged — mine would too, if I had hands. I'll see you next Crafternoon. Bye-bye for now, my dears!
Scenes