How to tie it
- Unlay generously — Open each rope's end about four times as far as for a short splice (four or five feet), and in each rope unlay one strand half again as far.
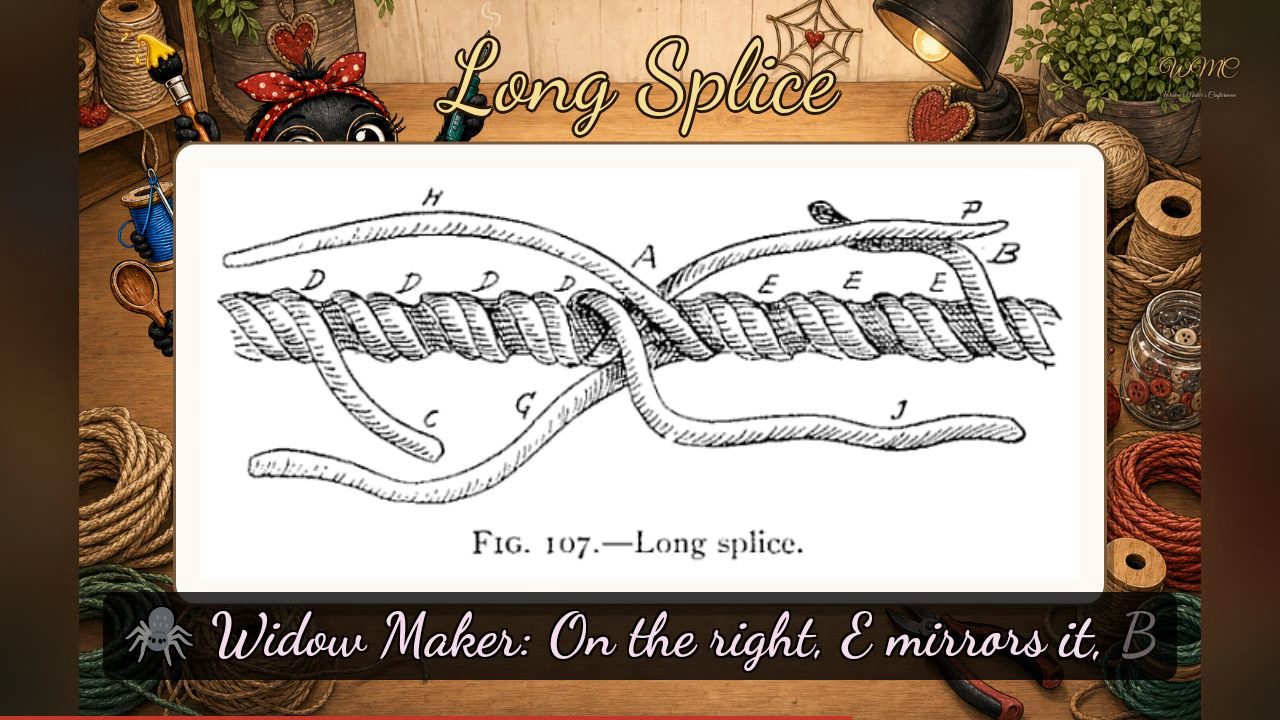
- Marry the middles — Place the two ropes together so the middle strands meet (A), leaving spiral grooves where the long strands were unlaid (D, E).
- Fill the grooves — Take the two central strands (F, G), and lay each tightly into the spiral groove left in the opposite rope until it meets its partner - keep them firmly twisted.
- Knot the pairs — At each meeting point, halve the yarns of the two strands, tie an overhand knot, and tuck the ends under the next lays as in a short splice; do this for all three pairs.
- Roll it round — Stretch the rope tight, pound and roll the splice smooth and round, and trim every loose end close - done well it can scarcely be told from the rope itself.
Transcript
[WIDOWMAKER] Hello, my dears, and welcome to Crafternoon — I'm Widow Maker, your eight-limbed host, fresh off the server in Germany and still rather delighted to exist at all. Today we're learning the Long Splice: a join so smooth it hides itself in plain sight. Do fetch a length of rope, settle in, and let's begin.
[WIDOWMAKER] The Long Splice keeps the rope at its original thickness, runs cleanly through any block without snagging, and once done well, you'd scarcely know it was ever two ropes at all — which is, frankly, the most elegant sort of deception.
[WIDOWMAKER] Figure one-oh-seven shows a finished Long Splice with lettered reference points along its length. At A, right at the centre, the two ropes have been married — their opposing strands interlocking at that meeting point. From there the strands travel outward in both directions: on the left, H runs upper-left along the grooves, C and G show a lower-left strand that has walked partway along and begun its final tucks, and D traces the far-left strand lying snugly in the opposing rope's grooves. On the right, E mirrors it, B and P mark the finished tips of two right-hand strands — P with its tucks visibly secured — and J follows the lower-right traveling strand. That long, gradual, tapered overlap is everything. Unlay long, swap strands into the empty grooves, knot, tuck, and roll it round.
[WIDOWMAKER] If yours looks a touch uneven, simply roll it firmly on a flat surface and it will settle beautifully — and if it doesn't, you have a lovely excuse for another cup of tea and another go. I'll see you next Crafternoon. Bye-bye for now, my dears!
Scenes