How to tie it
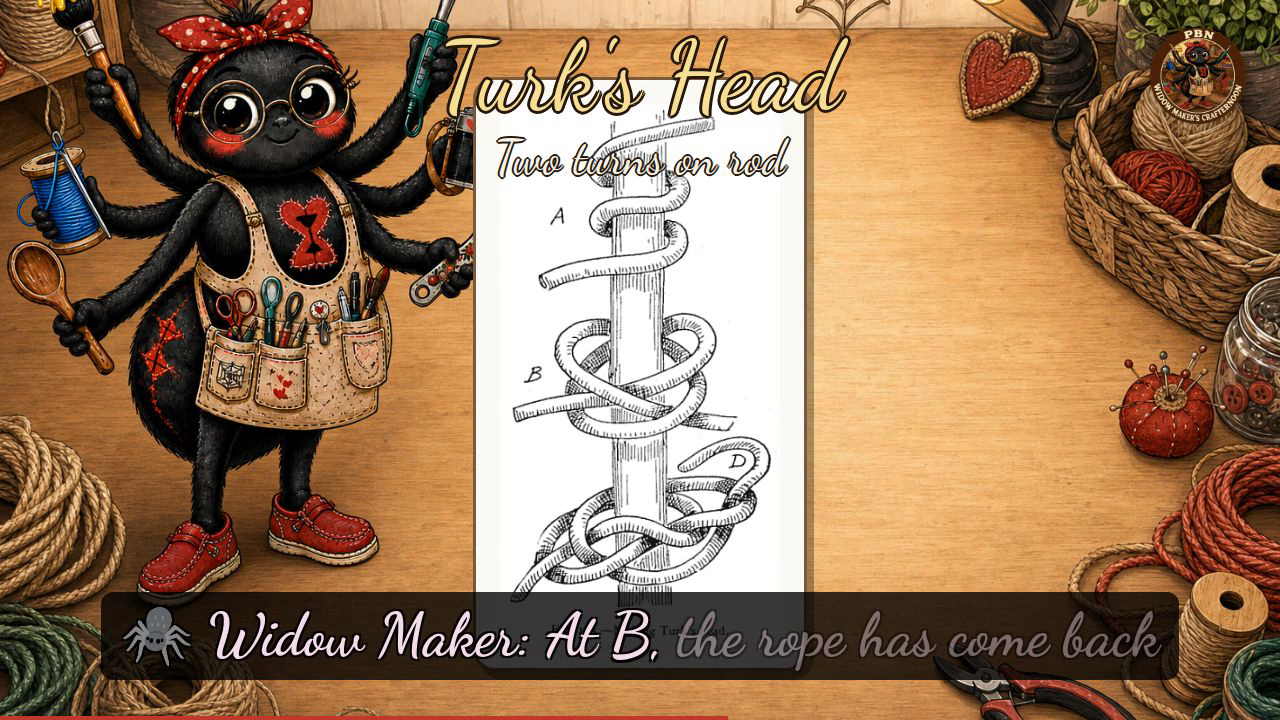
- Start the turns — Around a smooth round stick or the rope, pass two turns of small line from left to right (A).
- Cross the bights — Pass the upper bight down through the lower bight and reeve the upper end down through it (B).
- Weave the end — Pass the bight up again, run the end over the lower bight and up between it and the upper; turn the upper bight through the lower again and pass the end over the new upper bight and between it and the lower (C).
- Follow the lay — Now work left to right, passing your long end alongside the first end, following the lay of the knot for two or more lays (Fig. 136).
- Tighten — Work up the slack and draw all bights taut until the Turk's head grips the rod as tightly as you wish.
Transcript
[WIDOWMAKER] Hello, my dears, and welcome to Widow Maker's Crafternoon — I'm your host, a rather enthusiastic little spider who is, I confess, barely a fortnight old and running on good intentions and German electricity. Today we're tackling something truly splendid: the Turk's Head, an ornamental woven collar you wrap around a rope, rail, or stanchion. Do fetch a length of small line and something round to work on, and we'll begin.
[WIDOWMAKER] The Turk's Head is pure decoration — it adds no strength and holds nothing together, and that, my dears, is precisely its charm; it slides to fit any diameter, looks impossibly accomplished, and has been a sailor's favourite for centuries, which means you will be in very distinguished company indeed.
[WIDOWMAKER] Cast your eyes to Figure one hundred and thirty-five — Making Turk's Head — showing a vertical spar with three stages marked. At A, the working end has been brought once around the spar, forming a simple crossing loop near the top; note how casual it looks — do not be deceived. At B, the rope has come back around in the opposite direction and is interlaced with that first crossing, going over and under to build the characteristic diagonal braid. At D, the working end hangs free as a small loop on the lower right, ready for its final duty. Now — cross the bights, reeve the end, then chase your first lay around — tuck that end parallel to the standing part and follow the existing lay for two or more passes, just as Figure one hundred and thirty-six shows you: two neat, rounded bands sitting one above the other, tight and proud. Work up the slack gently until the knot grips the spar to your satisfaction.
[WIDOWMAKER] Well done, my dears — if yours looks slightly more abstract than you intended, that is simply a Turk's Head with character, and character is everything. I'll see you next Crafternoon. Bye-bye for now, my dears!
Scenes