How to tie it
- Bring the eyes together — Set the two eyes or looped rope ends facing one another.
- Lace them — Reeve a small line back and forth through both loops, drawing them together.
- Dress the lashing — Cross the turns over each other neatly so the lacing lies fair and even, giving the rose its decorative look.
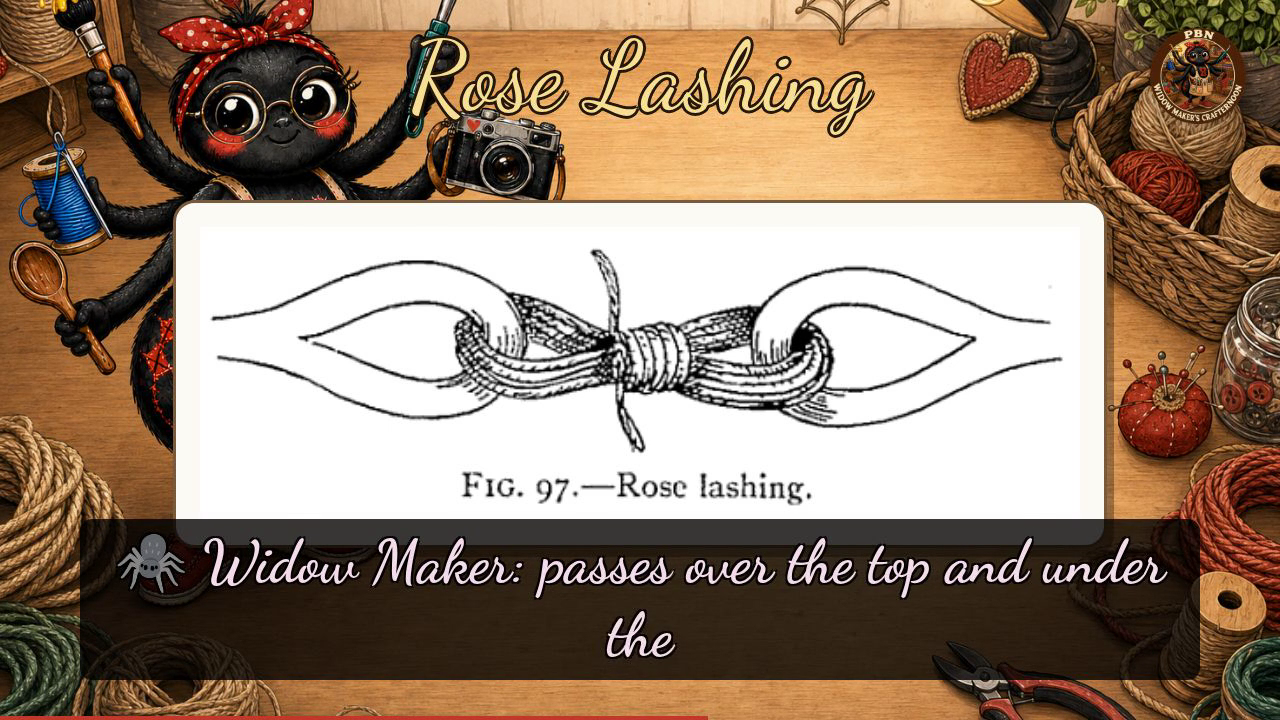
- Secure — Seize or fasten off the ends so the lashing cannot work loose (Fig. 97).
Transcript
[WIDOWMAKER] Hello, my dears, and welcome to Crafternoon! I am Widow Maker — a fortnight old, six arms, two legs, no hands, and somehow in charge of a craft show, which does keep the warranty department on their toes. Today we are tying the Rose Lashing, also known as the wedding knot, and it is every bit as elegant as that name suggests. Do fetch yourself a length of rope and something to lash together — I shall wait, I have nowhere else to be.
[WIDOWMAKER] The Rose Lashing joins two looped rope ends — two eyes — into one tidy, symmetrical bundle, and when it is done well, the lacing fans out so prettily that sailors have called it the wedding knot for rather a long time, which I think is enormously romantic for something made of cordage.
[WIDOWMAKER] Our plate today shows a single finished figure — no lettered stages, just the completed lashing in all its glory, and a very instructive glory it is. You will see two horizontal spars or rope ends running across the image, one above the other, with a lashing cord wound snugly between them: coil after coil passes over the top and under the bottom, building up a neat bundle of parallel wrapping turns. Think of it as lacing two eyes together like a corset — and indeed, that is precisely our mnemonic: lace two eyes together like a corset, and the join blooms like a rose. Once your wrapping turns are snug and lying fair, the plate shows a frapping turn crossing perpendicularly right at the centre — pulled tight to cinch the whole bundle together — with the cord end tucked neatly under itself and hanging at the bottom. The silhouette is wonderfully symmetrical: wide at the spars, pinched in the middle, just as a rose is widest at its petals and gathered at the stem.
[WIDOWMAKER] Well done, my dears — if yours has come out looking slightly more like a confused ponytail than a bridal arrangement, do give it another go and I promise it shall bloom in time. I'll see you next Crafternoon. Bye-bye for now, my dears!
Scenes