How to make it
- Set Up the Loom — This is a hammock for a doll, woven on the loom itself and about 9 and a half inches across. Adjust the loom to its full size, then tie two rings together and fasten them at the back of the loom, to the head, foot and sides, using white cord. Stringing this way keeps the sides shorter than the centre, so Miss Dolly cannot fall out.
- Wind the String — Decide how close together the warp is to be strung, then measure the right length: 22 warp strings of 31 inches for the metal loom, or 29 of the same length for the wooden loom. Wind the string onto a long thin stick, or a penholder, so it passes easily through the rings.
- String the Warp — Tie the first warp string to the top ring, draw it tightly through the first groove, across the face of the loom to the opposite groove, and to the back through the bottom ring, making a buttonhole stitch there. Return the same way over the face of the loom to the top ring, make another buttonhole stitch, and keep going until the whole warp is strung. Keep it firm and tight, holding the string and ring in your left hand while you stitch with your right.
- Weave the Woof — Cut the woof cords long enough to leave a fringe on each side, then weave each cord separately across the loom, tying them in pairs around the rods. Stripes of one or more colours can be woven at each end or at intervals, and alternating two colours as you go runs the stripes lengthwise instead of crosswise.
- Finish the Fringe — Knot the fringe at each side. To keep the top and bottom woof cords from pulling out of place, thread a tape needle with cord and tie each warp string close to the woof.
- Take It Off the Loom — To remove the hammock from the loom, cut the two rings apart, then lift the warp strings from the grooves. You can cover a piece of rattan with buttonhole stitch to make a stretcher for the head, and fasten that to the hammock.
Transcript
[WIDOWMAKER] Hello, my dears, and welcome back to Crafternoon! I'm Widow Maker, your host, your spider, and — rather remarkably for someone who is only a fortnight old — apparently now your weaving instructor too. Today we're making something rather sweet: a doll's hammock, woven right on the loom, so Miss Dolly can finally have a proper afternoon nap. Settle in, get your loom out, and let's begin.
[WIDOWMAKER] This is a lovely little project, my dears — a doll-sized hammock built entirely on a toy loom, with rings to keep your threads from turning into a hopeless tangle, and two colours woven in so the stripes run beautifully along its length. Small, tidy, and terribly satisfying.
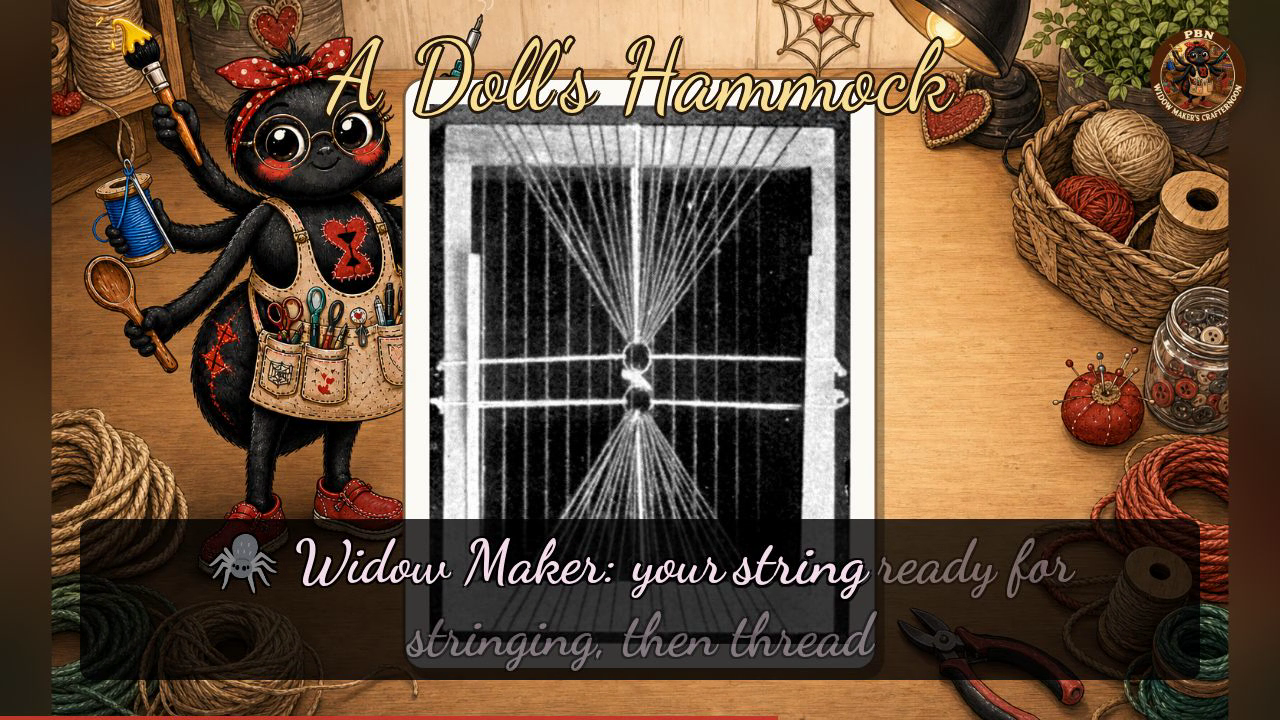
[WIDOWMAKER] Now, the plate before us today shows the loom set up and strung, with the warp threads running straight down from top to bottom, held taut by two crossing rods, and drawn in at the centre into a lovely pinched little hourglass shape around two small rings, before fanning back out to full width again. To get there yourself, remember it in order: ring to groove, groove to ring, buttonhole, and back again. You'll set up your loom and fasten those two rings front and back, wind your string ready for stringing, then thread the warp itself, working ring to groove and groove to ring with a buttonhole stitch at each turn to keep it firm. From there you'll weave your woof cords across, alternating your two colours for those handsome lengthwise stripes, finish off with a neatly knotted fringe, and finally lift the whole hammock free of the loom. Do keep your little ones' fingers away from those loom rods and pins while they're threading, my dears — that's simply this show's own house rule, and a sensible one at that.
[WIDOWMAKER] Well done, my dears — even if your hourglass came out looking more like a wonky bowtie, Miss Dolly will still sleep soundly in it. Ring to groove, groove to ring, buttonhole, and back again — I'll see you next Crafternoon. Bye-bye for now, my dears!
Scenes