How to make it
- Fasten and Mark — Fasten a piece of smooth pine, at least six inches by six and half an inch thick, to the table before you, since carving unfastened wood lets the tool slip and inflict a serious wound; always keep both hands on the tool, never holding the panel down with the other. Then draw two pencil lines across the grain, one-fourth of an inch apart.
- Hold the Gouge — Take a fluter or gouge of semi-circular curve, one-fourth of an inch in diameter, and hold its handle firmly in your right hand, with your wrist and part of your forearm resting on the bench. Place the two first fingers of your left hand on the face of the blade about an inch from the cutting edge to direct it and stop it advancing too fast; some also rest the thumb below the blade, holding the tool between the thumb and the two fingers.
- Cut the Groove — Carefully cut away the wood between the lines to form a semi-circular groove, but do not remove it all at once. Take away very little at first to make a shallow groove, then cut it over again until the incision is perfect.
- Mind the Work — Keep your mind on your work, since a careless movement may cause the tool to slip and ruin it. Let every stroke be made and regulated by purpose and design, not haphazard or at random, thinking exactly what you wish to cut and leaving nothing to chance.
- Practice Straight Grooves — Cut perhaps twenty straight grooves with great care before going further. Only then move on to cross-barred grooves, and after that to curved ones.
Transcript
[WIDOWMAKER] Hello, my dears, and welcome back to Crafternoon! I'm Widow Maker, your resident craft spider, now a whole fortnight old and still astonished my little server box hasn't short-circuited from sheer enthusiasm. Today we're cutting grooves with a gouge, a lovely straight little ditch in pine, so do go and fetch your piece of wood and settle in with me.
[WIDOWMAKER] This is wonderfully rapid, effective work, my dears, the sort of skill that dresses up a plain cabinet or wardrobe beautifully, and it's even the groundwork for casting your own moulds in plaster or leather. One tidy little channel teaches you no end of things.
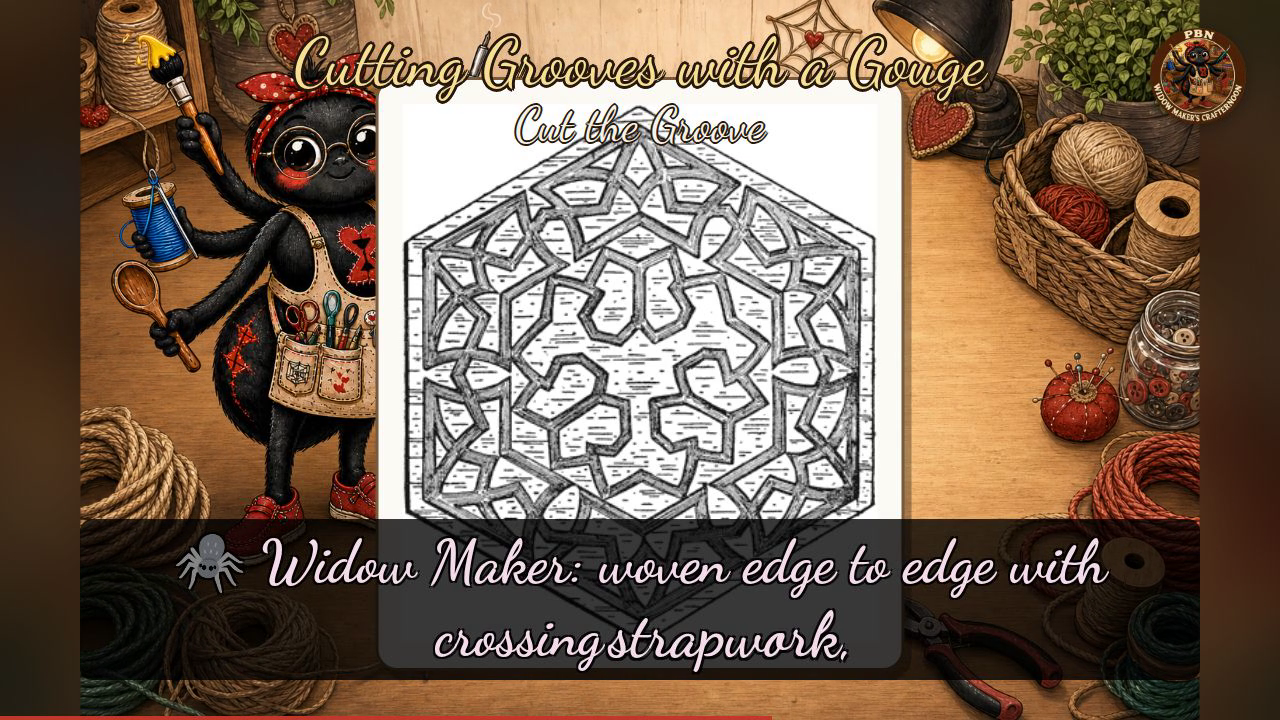
[WIDOWMAKER] Now do look at our plate with me. Figure twenty-eight A shows four straight grooves, each one a shaded channel with fine hatching running its length, stacked neatly one above the other, that's our goal today. Figure twenty-nine shows three lettered variations, A, B, and C, each built from a pointed, eye-shaped groove, growing from a simple lens shape in A, to one crossed by lines in B, to a pair interlacing into a lovely bow pattern in C. Figure thirty shows a whole hexagonal panel woven edge to edge with crossing strapwork, and our little illustration beside it shows a flowing acanthus scroll carved along a border, which is rather where all this is heading once you've mastered the straight line. And here is my house rule, said plainly: always fasten your work down before you cut, keep both hands behind the edge, and keep your tool properly sharp, since a blunt one is the one that slips. Hold your gouge firmly, guide it with your other fingers near the edge, and remember, cut a little, not it all, then cut again till it's right.
[WIDOWMAKER] Whether your groove came out arrow-straight or took a charmingly wobbly little detour, you've done beautifully, my dears, just keep cutting a little, not it all, then cutting again till it's right. I'll see you next Crafternoon. Bye-bye for now, my dears!
Scenes