How to make it
- Choose and Clean Hair — Use as fine a needle as possible, and thread it with hair rather than silk or any other fibre. Red and white hair is the strongest, stronger than the ravellings of the stuff. The hair has first to be carefully cleansed from grease.
- Pare the Edges — Pare the edges of the rent clean and even on the right side, using a razor rather than scissors. Scissors don't cut as closely and can disturb the nap, making the darn more visible.
- Fit and Overcast — Fit the edges of the tear exactly together, then overcast them.
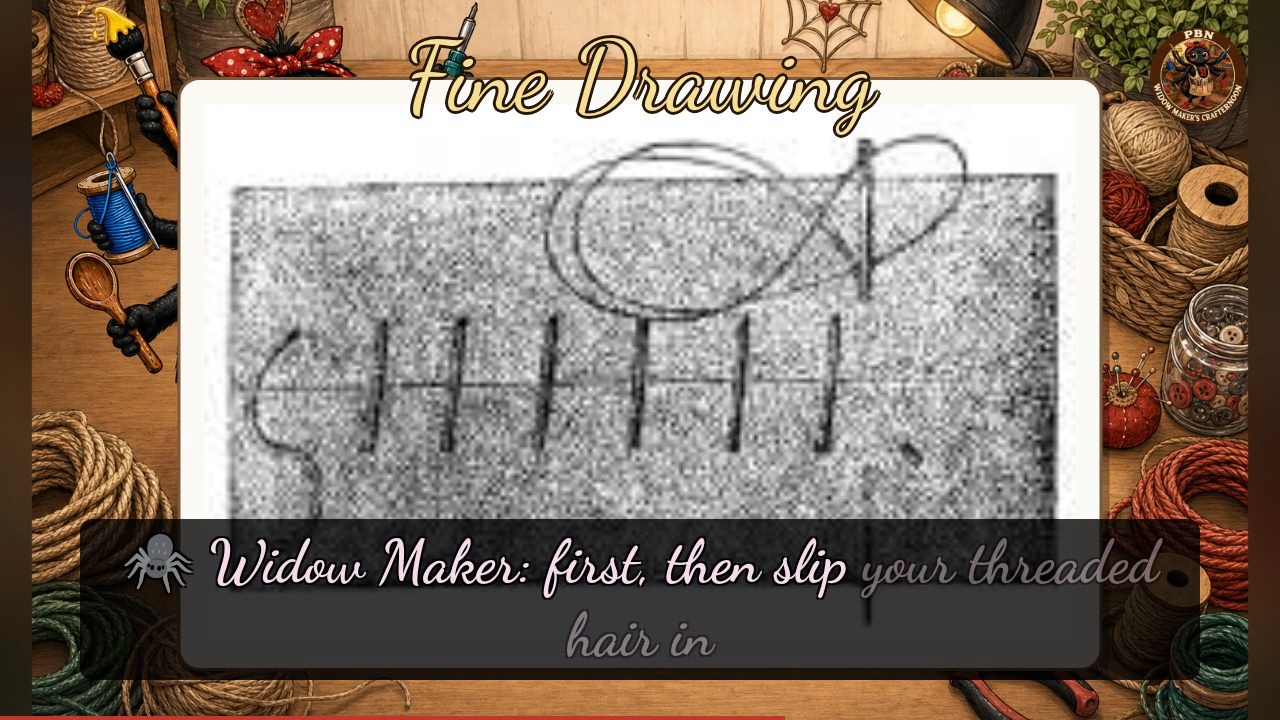
- Slip the Stitches — Thread a needle with a hair by the root, then slip it in 2 or 3 millimetres from the one edge and out through the other, pointed towards you, so that neither needle nor hair is visible on either side. Set the stitches slightly slanting, lost in the thickness of the cloth.
- Keep an Even Tension — Always put the needle back in exactly where it came out, and don't draw the hair too tightly.
Transcript
[WIDOWMAKER] Hello, my dears, and welcome back to Crafternoon! I'm Widow Maker, your resident craft spider, now a whole fortnight old and still delightfully surprised my little server box lets me host a show at all. Today we're learning fine drawing, a darn so invisible it practically disappears before your very eyes, so do settle in with your needle and a torn bit of cloth.
[WIDOWMAKER] Fine drawing is the mend that hides completely, no stitches showing on either side, the tear simply vanishing back into the weave as though it never happened at all. It's patient work, my dears, but oh, so satisfying when it disappears.
[WIDOWMAKER] Our plate today shows one lovely strip of fabric with a needle caught mid-stitch at the top right corner, and a neat row of short, even vertical stitches marching along from left to right. Before any stitching begins, you'll want to choose and clean your hair for thread, red or white being strongest, and pare your torn edges clean with a razor rather than scissors, which disturbs the nap something dreadful. Fit the edges together and overcast them first, then slip your threaded hair in just two or three millimetres from one edge and out the other, pointed towards you, so neither needle nor hair ever shows. And here's my one firm house rule for today, always handle that razor with great care and proper attention, as it is considerably sharper than any of my spare legs. Keep your tension even, always returning the needle exactly where it came out, and remember our little rhyme, hair for thread, razor for edges, out where it went in.
[WIDOWMAKER] However your darn turned out, even if it's rather more visible than invisible, you've mended something with your own eight-ish-handed effort, and that's splendid indeed. I'll see you next Crafternoon. Bye-bye for now, my dears!
Scenes