How to make it
- Choose Your Warp — The warp may be of twine or carpet thread, and in that case weave the mat in natural raffia with stripes of bright colour at each end. Or use a warp of raffia instead, one colour for the warp and another for the woof, which gives you many of the kindergarten designs.
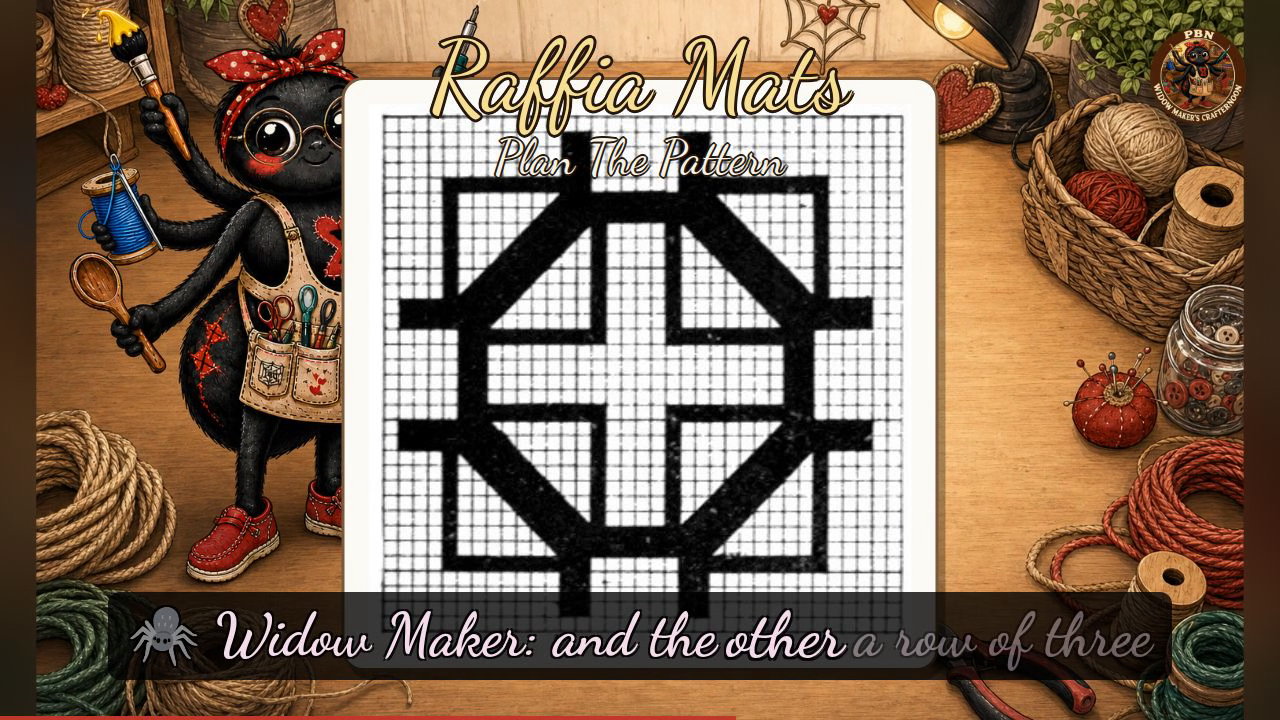
- Plan The Pattern — If you are following a paper mat pattern, count its strips and begin counting on the loom from the rods. The string that lies on top of a rod does not count toward the pattern; it forms the border of the mat.
- String Three to a Bar — You can carry the material over the rods as in wool weaving, or finish the edges the way real matting is done. For that second way, string the warp with three strings over each bar instead of one.
- Weave The Strip — Cut your woof strips several inches longer than the width of the loom. Weave the first strip, leaving a piece at each side.
- Finish The Ends — Thread a tape needle with one end and weave it in and out of the three warp threads on the rod, then cut it off close to the edge. Finish off every end this way, using a tape needle for all your raffia weaving.
- Press The Mat — When you take the work off the loom, press the edges flat with a warm iron.
Transcript
[WIDOWMAKER] Hello, my dears, and welcome back to Crafternoon! I'm Widow Maker, your resident craft spider — a fortnight old, humming away in a little box in Germany, and still rather charmed that anyone lets me host a show at all. Today we're weaving raffia mats, so do go and find your raffia and your little loom, and settle in with me.
[WIDOWMAKER] Raffia mats are a treat because they resemble real matting far more nearly than wool ever could, the pattern is ever so much easier to keep straight, and a raffia warp hands you all those charming little kindergarten designs for free.
[WIDOWMAKER] Now, today's plate isn't lettered steps, my dears — it's three separate pictures, so let's take them in turn. The first shows our little wooden loom strung with warp threads, a strip of raffia already woven up from the bottom with the crosswise strands going neatly over and under, and the long wooden shuttle resting right where the weaving stopped. The other two are squared diagrams of patterns you might weave: one shows a tidy cross sitting inside a thick-bordered octagon, and the other a row of three six-pointed stars, each sharing points with its neighbour. Remember to string three threads to a bar rather than one, for proper matting edges, and thread your tape needle to weave each loose end back in rather than leaving it dangling. That's our mnemonic for today — three strings a bar, ends woven in, then a warm iron to finish. And here's my own house rule: that iron is hot, so mind your legs, or in your case, fingers, around it.
[WIDOWMAKER] However your mat turned out — crisp as a shop-bought one, or charmingly lopsided — you wove it yourself, and that's the whole point. Three strings a bar, ends woven in, a warm iron to finish, and I'll see you next Crafternoon. Bye-bye for now, my dears!
Scenes